
Beautiful GiftPack - Inkscape Tutorial

inkscape-giftbox-tutorial

Hi welcome to this freshly new Inkscape Tutorial. This time we are going to create a Surprisingly beautiful Gift Box and as you would see despite it may look simple but it is tricky to create it. It took a lot of time to break it down to a tutorial. You can use this box to create a beautiful wallpaper for you Pc or Phone or you can use it anywhere you want. I have tried to keep the word count as low and understandable as possible to reduce the amount of theory. Obviously we want the fun of creating.

So lets begin.

inkscape-giftbox-tutorial

Two simple rectangle objects WxH - 50X60 px created and placed alongside each other.
inkscape-giftbox-tutorial

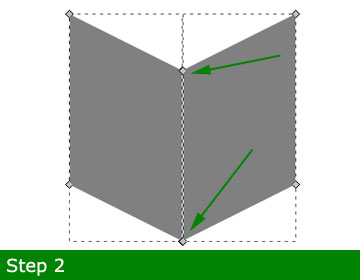
Both then converted to Object > Object to Path. Now select the middle nodes of both of them and move downwards. We are trying to create a simple 3D box.

inkscape-giftbox-tutorial

Here we have scaled them on X-Axis to make it a bit wider.
inkscape-giftbox-tutorial

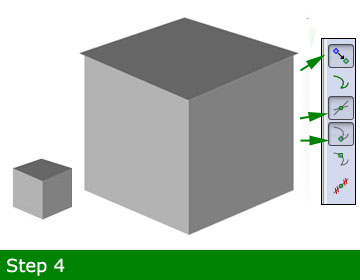
A new shape created at the top clicking directly on nodes of the box wall objects. You can enable Node snapping (Shown in image)to make it easier to do. We have made it a little bit bigger to create the box cover.

inkscape-giftbox-tutorial

Now duplicate this shape and move it upwards.
inkscape-giftbox-tutorial

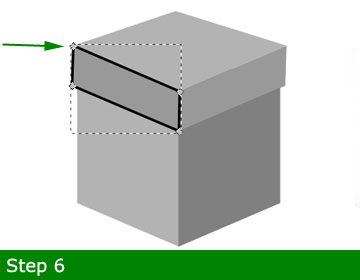
Leave the Node snapping enabled and create the box cover sides. In this image the black stroke is displayed black to identify the real shape. We will remove the stroke in the next step.
inkscape-giftbox-tutorial

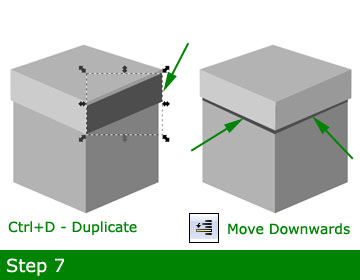
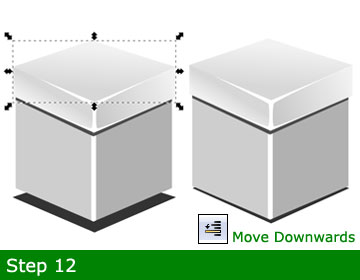
Now the cover side wall is Duplicated Ctrl+D and filled with a dark gray color. We then moved it little bit downwards and then under the box cover to create the box cover shadow effect. Use the Move Object one step downwards button shown in image to do this.
inkscape-giftbox-tutorial

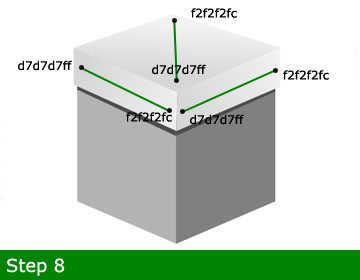
To Fill gradient in box cover you can use the color values and the direction of linear gradients as shown.
inkscape-giftbox-tutorial

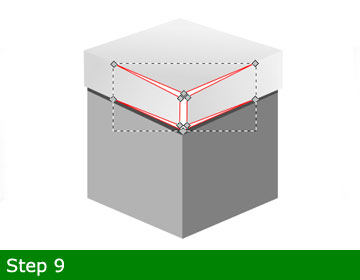
Lets create a shape at the corner of box cover. This will help the box cover appear as a hardobject. The red strokes are just to define the flow of the shape and will be removed later.
inkscape-giftbox-tutorial

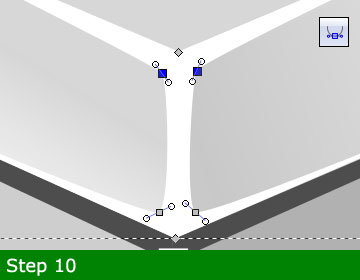
A zoomed view of the shape. We converted the inner 4 nodes to symmetric and moved the handles as shown to create a curve.
inkscape-giftbox-tutorial

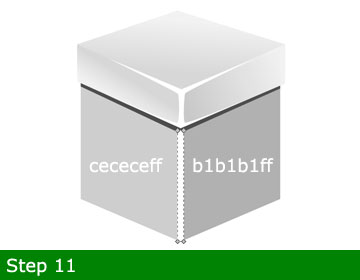
Here is the overall look of the Box cover. A simple white rectangle shape is also added in the middle of the main box, again to create a solid object look.

Later the left and right wall of the box are filled with colors.(Values shown in image.)
inkscape-giftbox-tutorial

Simply the toppest object is duplicated and moved downwards underneath the whole box and filled with dark gray color. To move and place the object precisely you can use Arrow keys + Alt.
inkscape-giftbox-tutorial

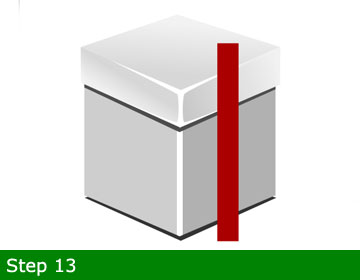
Lets create the Giftpack ribbons to fasten it. A rectangular strip is created and filled with aa0000ff color.
inkscape-giftbox-tutorial

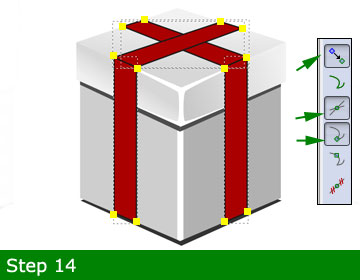
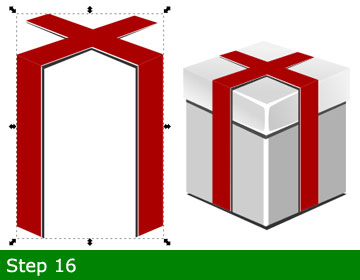
Now we created three duplicates of the red ribbon strip and converted to Object to path and manipulated the shapes individually as shown using Move nodes tool.

To enable the node snapping, buttons are displayed for help.
inkscape-giftbox-tutorial

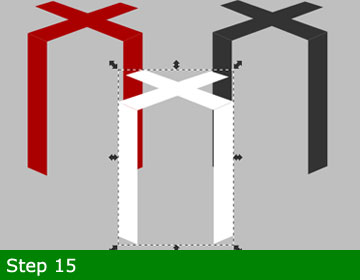
Later we grouped the whole ribbon object and duplicated 2 times. Filled with colors as shown.White for highlight and darkone for shadow effect.
inkscape-giftbox-tutorial

Now the ribbon object shape, highlights and shadows are placed underneath main ribbon using the move step downward tool as shown. Then we placed it back on our Gift Box container.
inkscape-giftbox-tutorial

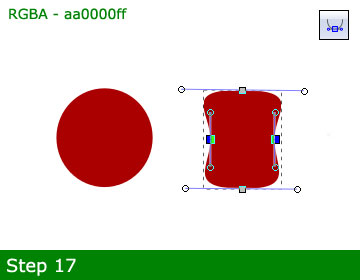
Now lets create the Bow object to make it more attractive. A simple circle object converted to Path and manipulated as shown.
inkscape-giftbox-tutorial

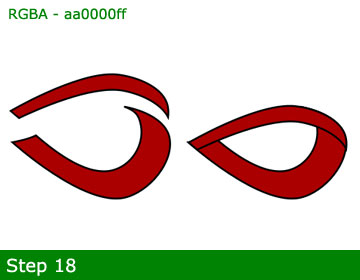
Then we made the bow loop shape as shown. They are two different objects placed together seamlessly.

inkscape-giftbox-tutorial

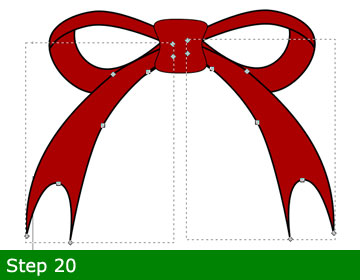
Putting it all together to make the bow shape. Looks ok?. We will decorate it more later.
inkscape-giftbox-tutorial

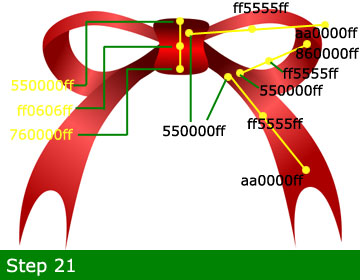
Adding more shapes to bow object to complete it and make it beautiful. Remove the strokes for the whole object as displayed later.
inkscape-giftbox-tutorial

Here comes the fun part but will be tricky to do. We have filled gradients in all of the bow internal individual shapes. You can see the color values used and the direction of gradients filled. For the left side you can simply duplicate the right side and flip Horizontal pressing H.

inkscape-giftbox-tutorial

Now we grouped the completed bow object and placed it smoothly on the top of the GiftPack.
inkscape-giftbox-tutorial

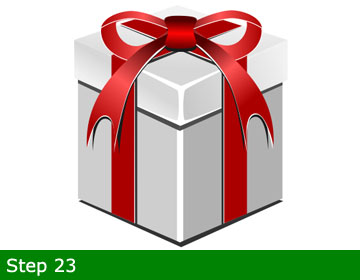
Here is the final Giftpack box. Notice we have added a shadow shape to the bow object also and the white hightlight shapes like we did earlier.

Inkscape-Giftbox-Tutorial

Please comment whether if you find the tutorial informative and useful and share with people fond of Graphic designs. Thanks for reading and following the tutorial.


Christmas Tree - Final Composition

Inkscape Tutorial - Christmas Tree

Hi. Welcome back . You can call this tutorial a II part to the Christmas Tree Inkscape Tutorial we posted earlier. I didnt like the Cute Christmas tree we created earlier was left alone just like that on the blank page. I wanted to make it a complete composition giving the tree a cool Environment.

Glassy Shiny Sphere - Inkscape Tutorial

Hi let us create a set of Glassy shiny transparent Spheres. They will look beautiful when we finish . The steps are simple and easy to follow. You can contact me at any step where you feel stuck or might be a mistake from my side. Just a basic beginner level knowledge of Inkscape is needed to follow this tutorial. So lets begin.

Lets begin creating our Glass Spheres.

 Shiny Glassy balls_Inskscape Tutorial

Step 1: Creating a simple circle.

First we create a simple circle. Press Ctrl before dragging on canvas to make it a perfect circle maintaining the aspect ratios. Choose any color you like and set the Saturation Fill & stroke >> HSL Tab S to 255 to have bright color. Keep a duplicate of this circle kept aside out of the main canvas area. We will need it later.

 Shiny Glassy balls_Inskscape Tutorial

Step 2: Adding Stroke.

Enable the stroke in Fill and Stroke Pallete. Set Stroke size to 6px in stroke style and Click the Linear Gradient button to have strokes with gradient applied.

 Shiny Glassy balls_Inskscape Tutorial

Step 3: Edit and fill gradient in stroke.

Now we change the position of the gradient by holding and moving the nodes of the gradient. The top one is black in color while bottom is white.(These are applied colors by default)

 Shiny Glassy balls_Inskscape Tutorial

Step 4: Filling gradient inside to create the sphere look.

Apply gradient to main circle fill . Use your choosen color as the main keep it white in center. Apply color opacity values as displayed in step 4.

Step 5: Creating refraction objects using boolean operations.

This step is little tricky. Make two seperate duplicates of your circles and take them aside(Leaving the main circle intact).Now put them one on top of other as shown while both selected click Path >> Intersection from main Menu

 Shiny Glassy balls_Inskscape Tutorial

Step 6: Shape left after intersection operation.

Now we will be left with this shape and will use it to create the Illusion of refraction. Disable the strokes for this shape as shown.

 Shiny Glassy balls_Inskscape Tutorial

Step 7: Applying a Glassy look using gradient.

Apply a linear gradient to this shape move the nodes and add additional nodes like displayed in Step 7. When ready place it on top of the main circle as displayed. The values for colors to manipulate are shown and remember the choosen color of yours is with 255 Saturation.

 Shiny Glassy balls_Inskscape Tutorial

Step 8: Creating the light reflection effect.

Now we create a new white ellipse and put it on top of the circle above the previous shape and transform it as shown. Then we apply gradient White to Transparent and move nodes like shown in image to creation the illusion of shining surface.

 Shiny Glassy balls_Inskscape Tutorial

Step 9: Creating internal shadow and refracted glow.

Go back to the duplicate shape of the main circle we kept aside for later use. We will use them now. Make one more duplicate of it. Make one bigger in size and other smaller as shown. I have given them different colors so as to easily recognise their shapes. Put the bigger one on top of the smaller one and Select Path >> Difference. You can use move forward or backward to place them as required. Again we make two copies of this remaining shape by duplicating.

 Shiny Glassy balls_Inskscape Tutorial

Step 10: Placing shadows and glows inside the sphere.

Fill one arc shape with 100% white and put it at the bottom of main circle and fill other with black and rotate it as shown and place it where shown.

 Shiny Glassy balls_Inskscape Tutorial

Step 11: Applying blur to internal shadow.

Easy step. Just set Blur to 5% for the black shadow shape.

 Shiny Glassy balls_Inskscape Tutorial

Step 12: Adding more Shines.

Now we will create a shining effect. To do this we create a simple white small circle as shown and fill it with Radial gradient white to transparent keep it transparent from the outside by manipulating the gradient color nodes. Then place it over the white shape we made in the last step.

 Shiny Glassy balls_Inskscape Tutorial

Step 13: Duplicating to create intense Shine.

Keep this white small shine shape selected and Duplicate 2/3 times by pressing Ctrl+D and it will make this shine more vibrant.

 Shiny Glassy balls_Inskscape Tutorial

Step 14: Creating the main sphere shadow.

Now we will create the shadow of our Glassy sphere. We create a simple ellipse with out choosen color and put it beneath the main circle as shown. Then move it backward to the last place. Then we apply 10% of blur to this shadow.

 Shiny Glassy balls_Inskscape Tutorial

Step 15: Creating Caustics for our glass sphere.

create one more small white ellipse place it as shown and apply 10% blur. This step will add realism to our Glassy sphere. The move forward/backward are also shown to easily identify and move shadows backward.

 Shiny Glassy balls_Inskscape Tutorial

Step 16: Adding reflecting environment lights.

Here we will add more realism to our sphere. Create small white circles filled with white to transparent gradient. Make 5 copies of them, resize and spread them randomly over the sphere's surface to create the illusion of light sources above it.

 Shiny Glassy balls_Inskscape Tutorial

Step 17: Grouping objects to a whole sphere.

Finally we select all these shapes and press Ctrl+G to group it into one object. we can move it easily now as one object.

 Shiny Glassy balls_Inskscape Tutorial

Step 18: Duplicating.Now we can have many spheres, Yeeeeee .

We are just about to finish. Make several copies of the glassy sphere and resize them randomly or as you wish. Use move forward or back to place them properly together so as there shadows dont overlap.

 Shiny Glassy balls_Inskscape Tutorial

Step 19: New layer for background.

Add one layer and choose Below current to place it under our main circle shape.

 Shiny Glassy balls_Inskscape Tutorial

Step 20: Adding background Object.

Create a simple rectangle shape. Resize it to cover complete canvas and then fill it with Gradient as shown. keep it white in the middle.

 Shiny Glassy balls_Inskscape Tutorial

Step 21: The treat.

And here is our final Outcome. See how beautiful, shiny and attractive these Glass balls look. Thanks for reading and working on this tutorial. If you liked it please comment below. It wont take more than one minute and share it with someone you think will like it. You can come up with your own versions of colors. Fill several colors. I am sure they will look more attractive then mine.