Hi. Welcome back . You can call this tutorial a II part to the Christmas Tree Inkscape Tutorial we posted earlier. I didnt like the Cute Christmas tree we created earlier was left alone just like that on the blank page. I wanted to make it a complete composition giving the tree a cool Environment.
Lets continue with the previous Christmas Tree inkscape file and make it a completed project.
Step 1: The file dimensions.
Copy your Christmas tree group and paste it on a new file and set the dimension as follows. Set units to Pixels this time. Name the layer as 'Tree'.
Step 2: Adding Background Sky and the Ground.
I - Create another layer below it and name it background. Create a rectangle 3/4 in height of the actual page and fill blue gradient with color nodes as shown in image above.
II - Create another layer above tree and name it Ground. Now add a simple rectangle object 1/4 in height of actual page,at the bottom as shown. The exact dimensions are not necessary. Fill the color with HEX value = d8ebf0ff.
Step 4: Adding Clouds in the Sky.
Now we have added a new layer above background as shown in layers palette named as Clouds and created few clouds using the ellipse tool and filled them with the HEX color value shown.
Step 5: Shaping the Clouds.
Convert all Clouds Object to path. Now select nodes of all the 4 cloud shapes together and click Insert New Nodes tool once. This will add more nodes to all the clouds. Convert all the nodes to smooth clicking Make selected nodes smooth. Now reshape all the clouds randomly as you like using the Edit path by nodes tool. Make sure the clouds don't overlap on each other.
Step 6: Another layer of Brighter clouds.
Here we duplicated the old 4 cloud shapes and placed them on another layer named as Clouds 1. Now fill them with color HEX value shown and reshape them randomly as we did.
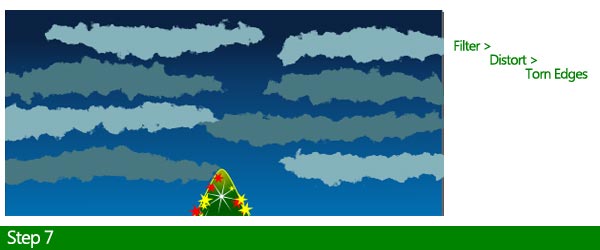
Step 7: Filter applied to create realistic Clouds.
Select all the cloud shapes on both the layers and apply Filter > Distort > Torn Edges. duplicate Now our clouds look more realistic in shape, right ?
Set the layer Clouds (with darker clouds) Opacity to 30% and Layer Blending mode to Multiply. And set Opacity to 50% for Clouds 1 layer Blending mode-Normal.
Step 8: Adding falling Snowflakes.
Create a new layer named snowflakes above ground layer and add a small 3X3 pixel Circle as shown in the image above.
Step 9: Spraying the SnowFlakes.
Now spray the snowflakes using the Spray Objects with the settings displayed at the bottom of the above image. You may have to drag and spray several times. TO spray you have to select the small flake object first and then use Spray Object tool.
Step 10: Adding snow to the ground surface.
Create another 3X3 sphere same as the ground color(d8ebf0ff). Select it and now spray it with setting apllied as displayed in image above. This will create an effect of snow over the ground surface. The red line over the ground displays the trajectory for the spray tool.
Step 11: Adding the Holy Star to the tree.
Simply create a new layer and add a star with 8 corners or as many or few as you wish. Fill it with a glowing gradient and place it at the top of the tree.
Step 12: Adding another star of divine Glow.
Add new layer below tree layer and add another star with 10 corners. Make it as big as shown (Exact dimensions not necessary). The purpose is to create a star of Divine aura to the Holy Christmas Tree.
Step 13: Applying rounded effect to the bigger Star.
In the Star object options decrease the rounded value to apply a rounded effect on the star. Try any value as you like and stop where you are satisfied. We applied -0.420. Your star object still may look different from ours. Finally reduce the star object opacity to 30% approx. in Fill & Stroke Palette.
Step 14: Final Composition
We hope you like this tutorial and the final Graphic. You can hide the Clouds floating out side the page area by adding Clipping object to the Clouds. Please feel free to ask and advise us of any information or step that is left unclear. Kindly comment and reply with your feedback(which is a must to get for us) and share it with your friends over Facebook, Twitter, Google+ and more.


Post a Comment